News & Events

Why Do I Have no Water Coming Through my Shower Head?

Feb 17, 2021
Why Do I Have no Water Coming Through my Shower Head?
View Full Size
( Source : The Plumbette )
By Rebecca Senyard

Last Thursday night, I was asked about a plumbing problem on Facebook by a follower named Carly*. It was an enquiry about ‘why do I have no water coming through my shower head?’

The water pressure in the shower had progressively started to decrease from normal pressure to a dribble in the last week. The water pressure was fine coming through all the other taps in the house – including the taps in the bath. From that information I knew that the washers had most probably disintegrated and needed to be replaced.

I was sent this photo to confirm my suspicions.

why do I have no water coming through my shower head

I told Carly, that once the new washers were replaced, the shower would work as normal. I also told her that she may need to call a plumber to reseat the taps if the shower rose started to drip after the washers had been replaced.

Carly’s husband, a tradie himself, showed his 14 year old how to replace the washers and the shower worked full bore, with no drips when the taps were turned off.

I asked Carly if I could share her photo and her story on the blog firstly to let you know that I’m always available for plumbing advice via the blog or through messages on Facebook. I also wanted to share the simple solution to a common problem with showers. In most circumstances I will recommend a plumber come out and fix a problem I’m asked about because by law, the installation may need to be done by a licensed plumber.

Changing washers doesn’t have to be done by a plumber, but I do recommend it if the taps need to be reseated.

Generally there are three reasons why there is no water coming through your shower head

1. The tap washers have disintegrated, stopping the flow of water to the shower head.

2. There is grit stuck in the water saving filter in the shower head that is stopping the flow of water. (Simply unscrew the shower head and removed the grit.)

3. The water main has been turned off. There will be no water to all tap outlets in the house if this happens.

If there is little hot water coming through the shower, but the cold water pressure is fine, the problem will be related to the hot water unit. Again, check out the hot water taps in the house and if the hot water pressure is fine to those taps, it will the washers in the hot tap of the shower that will need to be replaced. If the hot water to every tap is reduced in pressure, get a plumber out to check your hot water unit and test the tempering valve.

After my Facebook conversation with Carly, it got me thinking about what plumbing essentials are good to have in the tool box for tap emergencies. It’s always good to have few spare tap washers or ceramic disc spindles, multi-grips and long nosed plyers to retrieve the old washers.

It’s always a good practice to check the taps around your home to check for drips and make sure there is good pressure in all the taps when turned on. Make sure the taps are easy to turn off as well and don’t overtighten the handle when turning the tap off.

After Carly’s husband replaced the tap washers, I told Carly to go and enjoy a full bore hot shower. She told me her 14 year old had exclaimed, “wow, that is the hardest pressure ever” after the washers were replaced.

Glad I could be of service, while sitting at my dining room table.

Ever had issues with water pressure in your shower?

*Carly is not the real name of the reader that reached out to me.


6 Tips for Successful Spring Cleaning

Feb 10, 2021
6 Tips for Successful Spring Cleaning
View Full Size
( Source : the spruce )
Written by Sarah Aguirre

The flowers are blooming, the birds are serenading, and our house still feels like it's stuck with winter blues. Spring cleaning is a tradition that allows us to freshen up our homes and get a head start on the hectic seasons of spring and summer.

Clean Room-By-Room

Approaching your house room-by-room is the most effective way to deep-clean your home at any time of the year, but especially in spring. Use room checklists as a springboard for deep-cleaning the areas of your home that need extra attention. Feel free to skip items that have recently been cleaned and focus on the parts of your home that have been neglected all winter long.

Organize and Clear the Clutter

One of the biggest parts of spring cleaning is getting rid of clutter that you don't need. Now is a good time to advantage of the natural spring urge to get rid of items that are weighing you down and begin fresh with a more streamlined lifestyle. A systematic four-step approach to identifying problems, analyzing reasons, determining solutions, and implementing remedies can be extremely productive at this time of year. Sorting your belongings into four categories—trash, give-away, store, or put-way—can also be effective as you begin the spring-cleaning process.


Now is a great time to plan a garage sale or to donate items to good causes. Cleaning will be a lot easier when the clutter is gone.


Get the Family Involved

If you need a little help in your cleaning endeavors, get your family involved. Even the most unwilling helper can make a big difference in the workload. Don't worry: There are ways to deal with even the most reluctant helpers. This is a great time of year to get the entire family to work together. Try throwing on some music or establishing a family reward as an incentive to get the work done.


Tackle the Seasonal Chores

Some special chores need to be done seasonally. We ignore them for most of the fall and winter, but now it is time to bite the bullet and get these things clean. Even though these chores only need to be done once or twice a year, they will help your home run look better and run smoothly. Outdoor chores like cleaning grills, patios, and windows can be a little intimidating, but some simple tricks can keep the jobs manageable.


Keep Cleaning Products to a Minimum

The cleaning aisles of our stores are stocked full of commercial products to help you clean, but the variety can be overwhelming. And dozens of cleaning products means dozens of cleaning products to clutter up your cabinets and closets.


Resist the temptation to buy all these cleaning supplies; the real champions of spring cleaning are more basic supplies, such as a good all-purpose cleaner and microfiber cloths. There are even homemade cleaners you can make that will save you money while protecting the environment.


Establish New Cleaning Habits

A good, thorough spring cleaning that includes the whole house is a great time to establish new on-going cleaning habits, and it can also make the next spring cleaning a good deal easier. Simple 15-minute cleanup routines practiced every few days, each including a series of one- to two-minute chores, can make it remarkably easy to keep your home clean and tidy all year long.

Personal Hygiene

Feb 9, 2021
Personal Hygiene
View Full Size
( Source : healthdirect )

Good personal hygiene is one of the best ways to protect yourself from getting illnesses such as gastroenteritis and the common cold. Washing your hands with soap removes germs that can make you ill. Maintaining good personal hygiene will also help prevent you from spreading diseases to other people.

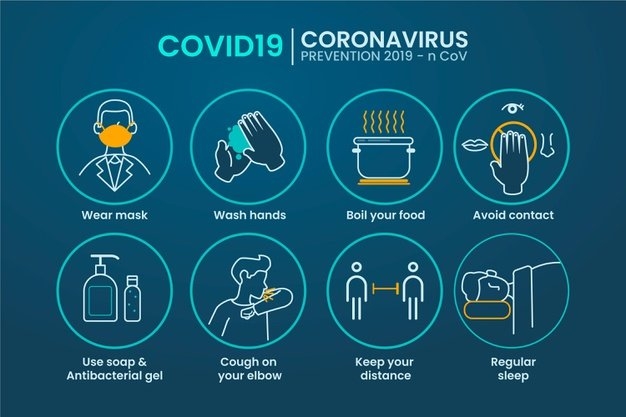
What is personal hygiene?

Personal hygiene includes:

  • cleaning your body every day
  • washing your hands with soap after going to the toilet
  • brushing your teeth twice a day
  • covering your mouth and nose with a tissue (or your sleeve) when sneezing or coughing
  • washing your hands after handling pets and other animals

Why is personal hygiene important?

Good hygiene is vital because it helps prevent you and your children from getting or spreading germs and infectious diseases. The germs that cause many diseases can be passed on through touching other people, getting faeces (poo) on your hands, handling contaminated food and coming into contact with dirty surfaces or objects.

Conditions that you can develop if you have poor personal hygiene include:

Washing your body

Try to bath or shower each day. Wash well, especially under your armpits and around your genitals and anus. Keeping clean will prevent skin irritations and remove bacteria that cause body odour.

Wash yourself with soap, shower gel or a hypoallergenic body wash. Soap removes more germs, but you may need to wash sensitive body parts with plain water or salt water.

If there is no tap water or it is scarce, clean yourself with a clean wet cloth or sponge.

Washing your hands

To avoid getting sick, wash your hands properly.

  • Wet your hands, then wash with soap or with an alcohol-based hand sanitiser for at least 20 seconds.
  •  
  • Lather between the fingers and the back of your hands.
  •  
  • Clean grubby nails with a scrubbing brush, if one is available.
  •  
  • Rinse both sides of your hands, preferably under clean running water.
  •  
  • Dry off your hands with a clean towel or let them dry in the air.

When to wash your hands

It is especially important to wash your hands after going to the toilet because faeces, which you might come into contact with, contains billions of germs. Also, wash your hands:

  • before and after eating or preparing food
  •  
  • after changing babies’ nappies
  •  
  • before and after touching a sick person or cleaning up vomit or body fluids
  •  
  • after blowing your nose
  •  
  • before and after treating cuts or wounds
  •  
  • after touching rubbish, dirty surfaces or objects
  •  
  • after handling pets or farm animals

Find out more here about hand washing.

Preventing body odour

After washing, apply deodorant to your armpits. Put on clean, dry clothing. Wash sweaty or dirty garments well and, if possible, hang them outdoors to dry. If you have a problem with excessive sweating, make an appointment to see your doctor.

Handling food safely

Wash your hands before and after preparing food. This will stop you contaminating food and will also protect you from getting ill or passing on bacteria from foodstuffs, such as raw meat. Find out more here about food safety.

Preventing bad breath

Bad breath can be caused by poor oral hygiene. Brush and floss your teeth twice a day since this reduces gum disease and the chances of future tooth decay. Use these dental care tips and make an appointment with a dentist for a check-up if you have further symptoms.


How to Fix a Toilet Flush Valve: An Easy Step-by-Step Guide

Feb 8, 2021
How to Fix a Toilet Flush Valve: An Easy Step-by-Step Guide
View Full Size
( Source : dengarden)
By XIXI12

If you hear your toilet running constantly, chances are you have a leaking flush valve. This is the most common problem in a toilet tank setup and is fairly easy to fix. Fixing it yourself can save a lot of money in water usage, and you won't have to hire a professional plumber.

Parts of a Toilet

  • Flush valve: The mechanism inside the toilet tank that regulates the refilling of the tank after each flush. It connects to a water source through a hose or a small pipe that attaches to the bottom of the toilet tank.
  • Ball float: The plastic ball that regulates water level.
  • Flapper: The flat circle that seals the flush valve seat.
  • Flush valve seat: The hole at the bottom of the tank.
  • Flush lever: The handle that connects to the lift rod from the outside.
  • Overflow pipe: The vertical pipe in the centre of the tank.
  • Refill valve: The ballcock.

Types of Toilet Tank Setups and Reasons They May Leak

There are two common types of flush valves in toilet tanks. The modern ones have a cylindrical float that moves up and down a shaft in a vertical fashion, while the older models have a tank ball float at the end of a long metal rod. Much like the cylindrical float, the ball float rises and falls with the water level in the tank. When the flush lever is pulled, it lifts the flapper, allowing the water in the tank to flush down into the toilet bowl. The cylindrical float or ball float then raises with the water level, shutting off the water supply once the correct level is reached.

When there is a leak from your toilet tank, it could be any of the following reasons:

  • The flush valve is damaged.
  • The flush valve doesn't seal tightly because of built-up mineral deposits.
  • The flapper is worn out.

To confirm a leak, simply turn off the tank's water supply, mark the water level, and wait about 30 minutes. Iif the water level has dropped, you have a leaking valve.

A small leak may seem unimportant, but if ignored, it will raise your utility bills and could even damage your flooring. It only costs about $8–$10 to fix it yourself, so follow the steps below before calling a plumber.
 

How to Install a New Flush Valve

If you've established that the cause of the leak is a damaged flush valve, you have to buy a new one. Take the damaged one to the store with you to make sure you are replacing it with the same model. Also, make sure that the new one has a vacuum breaker to prevent your water supply from being contaminated.

You'll need:

  • A wrench
  • A flat-blade screwdriver
  • A dry towel

To fix a one-piece flush valve that has the float and flapper integrated into the valve assembly, follow these steps:

Step 1: Turn off the Water Supply

Turn off the water supply to the tank completely. Depending on how it is set up, the knob can be found on the wall behind the toilet, or by the side of the tank on a small metal pipe leading into the floor. Use your hand or an adjustable wrench to turn the knob clockwise until the water stops running inside the tank.
 

Step 2: Flush and Get Rid of Excess Water

Flush what is left in the toilet bowl. Because the water supply is turned off, it should not refill again. Use a dry towel or sponge to suck up whatever water is left.

Step 3: Unscrew the Flush Valve

Unscrew the two rubber bolts by the sides of the flush valve using a screwdriver. Hold the nuts beneath the bowl with a wrench as you unscrew the bolts. Note: Do not force the bolts as it may cause the tank to crack or even break.
 

Step 4: Replace the Flush Valve

Take out the old flush valve and insert the new one into the tank opening so that the overflow pipe is facing the flush valve. Once you have it in place, hold the valve and tighten the screws using a wrench.

Step 5: Reconnect the Water Supply and Check for Leaks

Finally, reconnect and turn on the water supply. The tank should fill, allowing you to adjust the water level. Flush and check for leaks, then tighten any nuts as needed.

What to Do If Your Tank Has a Ball Float

Follow steps one and two above, then do the following:

  • Remove the ball float using a plastic snap.
  • Unscrew the nut or snap the rod out of the valve.
  • Put the flush valve through the hole in the bottom of the tank.
  • Hold the flush valve in place with a nylon nut. The nut should be snug, but be careful not to overtighten it.

Other Causes of a Leaky Toilet

Worn-Out Flapper

The flapper needs to be replaced if it looks warped or otherwise worn out. This is a super simple fix.

  • Remove the old or worn out flapper from the overflow tube and detach the chain from the handle arm.
  • Attach the new flapper to the overflow tube and hook the chain back on the handle arm.

Blockage in the Flush Valve Seat

If the flapper is in good condition and the tank is still leaking, the flapper may not be sealing against the flush valve seat due to mineral deposits.

  • Check for mineral deposits on the flush valve seat.
  • Clean the flush valve seat with an abrasive sponge. Don’t use anything that might roughen or scratch the surface, you just want to remove the built-up deposits.


Opinion: ItĄŻs time to talk about how toilets may be spreading covid-19

Feb 4, 2021
Opinion: ItĄŻs time to talk about how toilets may be spreading covid-19
View Full Size
( Source : The Washington Post )
Opinion by Joseph G.Allen


Joseph G. Allen is an associate professor, director of the Healthy Buildings program at Harvard University’s T.H. Chan School of Public Health and co-author of “Healthy Buildings: How Indoor Spaces Drive Performance and Productivity.”


It’s not something people like to talk about, but there’s a potential important source of covid-19 spread that deserves some attention: toilets.

Studies are showing that the novel coronavirus can be detected in stool samples and anal swab samples for weeks. In fact, scientists are testing wastewater as an early tracking system for outbreaks. And a recent case on an airplane identified the airplane bathroom as the potential source.


Here’s what we know: When you flush a toilet, the churning and bubbling of water aerosolizes fecal matter. That creates particles that will float in the air, which we will now politely call “bioaerosols” for the rest of this article.

Surprisingly little has been published on toilets and disease risk (well, maybe not surprisingly). But there are a few brave scientists out there. Take one 2018 study of flushing toilets in a hospital. Researchers found high concentrations of bioaerosols when a toilet with no lid was flushed.
 

How many airborne particles, exactly, are we talking about? Upwards of 1 million additional particles per cubic meter of air. Not all of the aerosols generated will carry the virus, of course. But, let’s be clear: When you flush the toilet, you’re breathing in toilet water, and whatever is in that toilet water — including viruses and bacteria.


The study also found that bioaerosols spread around the room and lingered in the air. In fact, basic aerosol physics tell us these bioaerosols will stay aloft until one of four things happen: they settle out onto surfaces, they are removed through dilution, they are removed through filtration or they are removed by your lungs.
 

When large bioaerosols settle onto surfaces in the bathroom, they create the potential for fomite transmission. (A fomite is any inanimate object, such as a countertop or door handle, that, once contaminated, can act as a source of transference to another person.) Most aerosols, however, will be small and will linger in the air.
 

This is why bathroom exhaust ventilation is so critical. The design standard for bathroom exhaust requires approximately one cubic foot of air removed per minute for every square foot of bathroom. So, a 7-by-10-foot bathroom requires about 70 cubic feet of exhaust per minute. This equates to roughly eight air changes per hour, meaning the full volume of air in the bathroom is replaced every 7.5 minutes.


The toilet issue could extend beyond your own bathroom. During the first SARS epidemic in 2003, there was evidence of an outbreak in an apartment building linked to sewage. The cause was empty U-traps in drains. Normally, these have a little bit of water in them that stops vapors. Investigators found that some apartments had drains with empty U-traps, which allowed bioaerosols from a sick patient to waft through the building’s pipes and into the air of other apartments.

The Chinese government recently reported something similar for the novel coronavirus. Investigators detected viral particles in a long vacant apartment on the 16th floor of an apartment building, one floor above where a sick patient lived. This set off an investigation, leading to the discovery of aerosols generated from flushing in the 15th-floor apartment reaching the 25th and 27th floors of the building, where two people on each of those floors had previously been recorded to have had covid-19.
 

So, what to do with all of this information to protect yourself? First, bathroom ventilation is your best defense. If you have an exhaust fan, turn it on when you enter the bathroom and leave it on when you’re done. If that fan is not on, or you don’t have one, crack open any windows (even just a few inches will help).


Second, make sure your U-traps aren’t dried out. An easy to way to check this is the simple sniff test. Do you smell sewer gas smell coming out of your shower drain or your sink drain? If so, that’s telling you your U-trap might be empty.
 

Some other common sense — though still worthy — tips: Flush the toilet when you’re done (this is mostly for parents with children). Flushing removes nearly all of the fecal matter, but, be mindful, some will remain on the walls of the toilet.

Close the lid. Research has shown that lidless toilets increase the risk of bacteria and larger particles escaping into the air. These settle out onto adjacent surfaces, creating a fomite hazard.
 

Clean and disinfect bathroom surfaces, and wash your hands vigorously after using the bathroom.
 

Last, and perhaps most importantly, trust your nose. Don’t go in if it smells bad. That’s your first hint that the air hasn’t been exhausted properly. Wait to let the room air out a bit.
 

The fecal-oral route is a known transmission pathway — I was worried enough to write about it in early February. While we don’t have a proven case of such transmission for covid-19, there’s no need to wait for the science to clear the air on this. You can take matters into your own hands and clear the air yourself.


10 Bathroom Cleaning Tips and Tricks

Feb 3, 2021
10 Bathroom Cleaning Tips and Tricks
View Full Size
( Source : Reader's Digest Canada )

Banish grime and soap scum

Forget about purchased “miracle” products. Instead, stir three tablespoons baking soda and 1/2 cup household ammonia into two cups warm water. Once you’ve wiped the solution on and rinsed it off with a sponge or rag, bathroom surfaces will gleam.

Neutralize gross household smells using these pantry items.
 

Toilet cleaning made easy


Cleaning a toilet ranks somewhere around zero on the Pleasant Cleaning Tasks scale, but you have no choice but to tackle it. Here are a few ways to make the job easier and pocket the cost of specialty cleansers.

  • Antacid Tablets: Drop two antacid tablets or one denture tablet containing baking soda into the bowl, let them dissolve for about 20 minutes, then scrub the bowl with a toilet brush. A vitamin C tablet will do the trick as well.
  • Mouthwash: Grab a bottle of mouthwash from the medicine cabinet and pour ¼ cup into the bowl. After about half an hour, scrub the bowl with a toilet brush and flush.
  • Cola: Empty a can of cola into the bowl and let sit for 30-60 minutes before scrubbing and flushing.

Get mildew-free shower curtains


The moist environment of a bathroom is just made for mildew, so don’t be surprised when it appears on your shower curtain. You can keep it at bay for a while, at least, by soaking curtains and liners in salt water before hanging them. Once they’re up and any mildew appears:

  • Add ½ cup borax and ½ cup vinegar to two cups water, pour onto the affected areas and let sit for eight-10 minutes. Then scrub with a sponge or cloth.
  • Mix two tablespoons washing-up liquid with one pint household bleach and spray the solution on the curtain.
  • Make a paste of vinegar and salt, and spread it onto the mildewed area. Let it dry for one to two hours and then clean it off with a damp cloth.

Clean the ceiling


You’re probably so busy cleaning the fixtures and tiles in your bathroom that you don’t even think about the ceiling. Look up, but prepare yourself what you might see—mildew, spots, built-up grime. To clean it easily, fill a mop bucket with equal parts water and white vinegar. Then put on goggles or other protective eyewear. Dip a long-handled sponge mop into the solution, squeeze it out and reach up to clean one section of the ceiling at a time.
 

Get spotless bathroom tiles


The grouting between bathroom tiles is a magnet for dirt and germs and it’s easy to miss these hard-to-reach crevices during regular cleaning. It also looks awful so every so often:

  • Make a paste of one part borax, two parts baking soda and one to two parts water and scrub it onto the grout with a toothbrush.
  • Rub away grime with a new pencil eraser, that’s well suited to reaching these narrow spaces.
  • Scrub with a mouthwash containing a tooth-whitening agent.
  • Soak a cotton wool ball in household bleach and set it on a spot of badly stained worktop grout for a few hours; for walls, attach the cotton ball with gaffer tape.

Lemony toilet cleaner


Make a paste of two to three parts borax and one part lemon juice (stir the juice in gradually until you have the right consistency) and apply it to a stained toilet bowl, rim included. Let it sit for 1 1/2-2 hours and then scrub it off with a toilet brush. This treatment is especially effective for getting rid of the ring that often appears at water level on the toilet bowl.
 

Solve stubborn scum and water spots


Many surfaces in the bathroom—including ceramic tiles around sinks and tubs, and glass fibre and acrylic shower units—can become dulled by water spots and built-up scum just as easily as tubs and sinks. Tackle these heavily soiled surfaces with vigour and…

  • Two cups salt dissolved in four litres hot water.
  • ½ cup vinegar, one cup ammonia and ¼ cup baking soda in four litres warm water. Apply one of the solutions, let sit for about 15 minutes, then scrub off and rinse.

Brush away rust stains


To get rid of hard-water rust stains on commodes, tubs, and sinks, just squeeze a little toothpaste onto an old toothbrush and scrub away. Or scrub the stain with a paste of borax and lemon juice or a solution of equal parts turpentine and salt. Whichever method you choose, attack rust stains right away. The sooner you deal with them, the easier they are to remove.
 

Keep showerheads unclogged


If you live in an area with very hard water, you’ll have noticed how mineral deposits can block showerheads. Don’t need to buy a new one—use denture tablets or vinegar to unclog it.

  • If you can remove the showerhead, dissolve four to five denture tablets in a bowl of water and put the head in to soak. Or let it soak overnight in white vinegar. (For extra cleaning action, heat the vinegar in the microwave first.)
  • If the showerhead isn’t removable, pour the denture tablet solution or vinegar into a plastic bag, tape or tie the bag to the fixture so the showerhead is completely immersed and leave the bag in place for one to two hours. To make sure the showerhead is completely unblocked, clean out the holes with a needle, piece of wire or toothpick. Then wipe the head with a cloth dipped in vinegar.

Make glass shower doors sparkle


Glass shower doors are a convenient addition to any bathroom but can quickly cloud up with soap scum. For some heavy-duty cleaning, try:

  • Shaving cream: Squirt on the foam and wipe clean with a dry rag; the foam will leave a film that keeps the door from fogging and makes it harder for scum to stick.
  • White vinegar: Keep a spray bottle filled with vinegar and a sponge by (or in) the shower so you can make washing down the surfaces part of your post-shower routine.
  • Baking soda-plus: Make a solution of 1/4 cup dishwashing-up liquid, 1/4 cup hydrogen peroxide and 1/4 cup baking soda. Then scrub it on the doors with a sponge.
  • Vegetable oil: Simply pour a little vegetable oil onto a sponge or paper towel and scrub the doors, adding more oil as you need it.
  • Furniture polish: Use a cloth to rub polish directly on doors, then wipe it off with a clean cloth. The polish will not only clean but will protect against the future build-up of soap scum.

6 Tricks to Keep Your Bathroom Mold-Free

Feb 2, 2021
6 Tricks to Keep Your Bathroom Mold-Free
View Full Size
( Source : the spruce )
Written by Anabelle Bernard Fournier

Whether you're an owner or a renter, battling bathroom mold is a must if you want to keep the room clean, safe, and healthy—not to speak of the damage to walls and ceilings!

Every bathroom will accumulate moisture—that's kind of a given. But by reducing your moisture levels in the bathroom, you can prevent mold from appearing, or slow down mold growth if it's already there.1

Keeping your bathroom mold-free is relatively easy if you are consistent in your cleaning and follow these easy tips and tricks to reduce the moisture levels in the room.
 

  • Get a Good Fan

    exhaust fan in a bathroom
     

    The Spruce / Ana Cadena

    The first thing you should make sure you have in every bathroom of the house is an effective fan

    Vents work by sucking the moisture out of the air and sending it outside. It's the first line of defense against moisture and mold.

    The CFM (cubic feet per minute) count on your fan will tell you if it's good enough for the space. If it's too small, buy a more powerful one.

    To calculate the ideal strength for your fan, multiply the square footage of the room by 1.1 if your ceiling is 8ft or 1.5 for 9ft.

  • 02of 06

    Run the Fan Properly

    running the exhaust fan after showers
     

    The Spruce / Ana Cadena

    It's not enough to run the vent during your shower or bath—you should leave it on for at least a half-hour after you're done.

    This prevents leftover moisture from damaging the walls and ceiling and from growing mold. A good way to manage this is to put the fan on a timer—that way, you don't have to go back to the bathroom to turn it off later.

  • 03of 06

    Love Your Squeegee

    using a squeegee
     

    The Spruce / Ana Cadena

    Sure, it's a bit of an annoying task, especially when you're rushed in the morning, but bathroom squeegees exist for a reason.

    In fact, taking a minute to run the squeegee on your tub or shower walls right after washing reduces the moisture in the room by up to 3/4. That's a lot of dampness you can get rid of and a lot of mold you can prevent.

  • 04of 06

    Fix All the Leaks

    fixing leaks
     

    The Spruce / Ana Cadena

    Bathroom mold doesn't just come from the water in your shower or bath. Leaks can also cause moisture to accumulate and mold to grow.

    Whenever you see a leak, don't leave it for ''when you have time.'' Fix it right away if you can, or call a plumber to do it for you if you need to. Waiting will only make things worse, especially if mold takes hold and starts growing. It's a lot harder to get rid of mold than it is to prevent it.1

     
  • 05of 06

    Wash Rugs and Towels Regularly

    used towels
     

    The Spruce / Ana Cadena

    The bath mat, bathroom rug, and towels are ideal mold growth spots, especially if you leave them unwashed for long periods of time.

    One easy way to help fight mold in your bathroom is to wash your towels and bathroom rugs regularly—at least once a week—and together.

    Clean towels and rugs mean a cleaner, healthier bathroom.

  • 06of 06

    Dry Out Your Shower Items

    drying off the shower
     

    The Spruce / Ana Cadena

    Here's another one that's counter-intuitive to a lot of us busy people, but still essential for keeping mold away: removing loofahs, sponges, and product bottles from the shower when not in use. 

    As they dry, water can accumulate under them, and they become the perfect breeding ground for mold and mildew.

Don't Let It Grow

As with every prevention method, the best way to avoid mold is to avoid the conditions where it grows in the first place. This means removing water and moisture out of the air and keeping fabrics clean, as well as avoiding water buildups.


How to Deep Clean Your Toilet Properly, According to Our Expert

Feb 1, 2021
How to Deep Clean Your Toilet Properly, According to Our Expert
View Full Size
(Source: GOODHOUSKEEPING)
By ZEE KRSTIC

Believe it or not, our toilets actually can be one of the cleaner things in our bathrooms; according to a 2011 study conducted by NSF International, our toothbrush holders can host the highest amount of viral bacteria, germs, and mold in our bathroom. But 27% of the toilet seats involved in the study (as well as 14% of toilet handles) contained alarmingly high amounts of mold, yeast, and germs, which illustrates that many people aren't cleaning their toilets correctly. While you may clean or wipe down your toilet often, the best way to remove germs and viruses is to actually disinfect it.

Carolyn Forte, the director of the Good Housekeeping Institute Cleaning Lab, says that many people neglect reading the instructions on their cleaning products — and don't realize that they need to leave toilet surfaces wet with cleaner for a certain amount of time to kill germs entirely. ''Yes, a product can claim that it kills 99% of germs and bacteria. But it needs to stay wet to be effective, and if you're using it for a matter of seconds, it's not going to be effective,'' Forte explains.

Charles Gerba, Ph.D., a professor of epidemiology and bio-statistics in the Department of Environmental Science at the University of Arizona, found that a single flush could send E. coli bacteria into the air (and onto the toilet itself) where they can float in the airstream for up to six hours, in research published in the journal Applied Microbiology. The research notes that it's unclear if this airborne bacteria could pose the same risk as other sources of germs, but Gerba tells Good Housekeeping that viruses in general can live on surfaces like your toilet anywhere from a few hours to a few days. ''Most cold and flu viruses survive from a few hours to up to 9 days, [depending] on temperature and relative humidity,'' he says.
 

Below, Forte shares her advice for disinfecting all of the dirtiest surfaces on a toilet, plus a few tips to keep the rest of your bathroom as clean as possible.

How do you properly clean a toilet?

Before you get started, you'll need to be well equipped for the job. Forte says that she recommends people keep a separate set of cleaning tools that aren't used on other surfaces across the home. While she says there are a multitude of bathroom cleaners that homeowners can use, she recommends the following list of supplies based on each product's clear instructions that state time limits for proper disinfecting of toilet surfaces.

  • A bristle scrubbing brush (can be stored in a separate holder in your bathroom)
  • pair of rubber gloves
  • One or two Scotch-Brite Scrub Sponges
  • A gallon of Clorox bleach, regular variety (can be used across the home)
  • A bottle of Clorox Toilet Bowl Cleaner With Bleach
  • A pack of disinfecting wipes of your choice
  • A bottle of Lysol Power Bathroom Cleaner
  • If you don't have access to a specific toilet bowl disinfectant, the next best thing is actual bleach itself, Forte says. Simply measure out half a cup's worth of bleach and pour it into your toilet bowl, using your toilet brush to scrub it into the bowl and beneath the bowl's rim, also allowing five minutes to pass before you flush it all away.

    A step-by-step guide to disinfecting the toilet:

    While you are waiting for your toilet bowl cleaner to properly disinfect, you can get started on cleaning the rest of the commode. Use a bathroom-specific disinfectant: Forte recommends Lysol's Power Bathroom Cleaner because it clearly states how long you'll need to leave the surface wet in order to neutralize common viruses and bacteria: 10 minutes.

    An Important Note: Forte says that disinfectants only truly neutralize germs if the surface has been pre-cleaned of any surface scum or debris beforehand. This means you'll need to pass over your toilet once quickly with a disinfecting wipe (or any disinfectant product) before applying another layer of disinfecting spray. You'll need to remove any bodily fluids, such as vomit, before applying your disinfectant spray for it to be truly effective, Forte says.

    1. Start with the exterior of your toilet. You can work your way up from its foundation to the lid itself. Spray underneath your toilet thoroughly and the sides of the commode thoroughly, Forte says. Be sure to spray the small area between the toilet seat and the tank, and work your way up the tank and on top of the tank itself.
    2. Then spray down both sides of the lid, starting with the exterior, as you'll need to leave the lid up to reapply spray if necessary.
    3. Next, spray both sides of the toilet seat thoroughly, and lower it back on top of the bowl once you've finished.
    4. While you are waiting for the disinfectant to air dry, tackle tough spots that are known to harbor more germs. Case in point: The toilet's flush handle, which can be even dirtier than the actual seat itself, according to the NSF International study. You can spray it specifically and be sure that it's wet for at least five minutes before it air dries. Alternatively, especially in between cleaning sessions, you may use a disinfectant wipe to vigorously rub the handle down before allowing it to air dry.
    5. After 10 minutes have passed, grab a clean sponge or clean paper towels to wipe away any condensation, ensuring that every surface is dry. Plus, don't forget to flush your toilet if you haven't already!
JOEBELANGERGETTY IMAGES

How do you clean a stained toilet bowl?

When you clean your toilet, you should always start with the bowl first, Forte says. You can use products that are marketed to clean and disinfect germs in the toilet bowl, but Forte recommends picking up a bottle of Clorox's toilet bowl cleaner that contains bleach, as the product claims it can disinfect the inside of the toilet in just five minutes. Using the Clorox product, Forte says you should coat the entirety of your toilet bowl starting underneath the bowl's rim: Then, put on your gloves and use your toilet brush to physically scrub the solution into your toilet bowl. ''Be sure to scrub well with the cleaner around the inside of your bowl, the toilet bend if possible, and underneath the rim of the bowl,'' she explains. ''Then, you'll want to let everything sit for five minutes, and flush it all away.''

How To Fix A Slow-Draining Bathtub: Six Methods

Jan 29, 2021
How To Fix A Slow-Draining Bathtub: Six Methods
View Full Size

( Source: dengarden )
By Paul Goodman
 

In my experience is that it's always worth trying to avoid the expense of employing a plumber if you can help it, and fixing a slow-draining bathtub yourself often isn’t anywhere near as challenging as many people think. Most clogged bath drain issues can be resolved by using some easy, affordable, and straightforward tools and methods.

Once you have fixed the bathtub drain, you should work on preventing or reducing the chances of it happening again—see my suggestions at the bottom of the page.

Six Ways to Fix a Slow-Draining Bathtub

  1. Use baking soda and vinegar (the natural alternative to chemicals).
  2. Use a commercial (chemical) clog remover.
  3. Use a plunger.
  4. Remove the drain stopper to inspect and gain access.
  5. Use a plumbers’ snake.
  6. Call a plumber.

I will go into each of the above methods in detail below. Generally speaking, the list starts with the easier, less-involved, and cheaper methods and progresses to more-involved and expensive methods. So if in doubt, start with #1, and work your way down through the list.
 

In my experience, clearing a clogged bathtub drain can often requires a combination of more than one of these methods.

Before You Begin to Fix Your Bathtub Drain

Plumbing is messy work. Put on some old clothes before you start. You may want to put down some old towels around the work area to soak up any water that spills. Stagnant water is unsanitary, wearing a pair of rubber gloves will protect your hands from germs.

1. Baking Soda and Vinegar

A more natural solution than using cleaning chemicals, this method will clear moderate blockages.

How to Unclog a Bathtub Drain Using Baking Soda and Vinegar

  1. Pour a half cup of baking soda down the drain opening.
  2. Pour a cup of white vinegar down the drain opening.
  3. The combined ingredients should foam for five minutes.
  4. Run the hot water and allow it to run through the drain for a minute or so.
  5. Examine the bathtub drainage to determine if it still is slow.

Note: The two main advantages of this method are that it is ecologically preferable, and won't cause damage to plastic pipes. It is not that effective on serious blockages, however, and you may still end up having to resort to chemicals.

2. Commercial (Chemical) Clog Remover

Widely available at hardware stores and supermarkets, strong chemical cleaners are designed to unblock drains. Follow the instructions on the label or box carefully.

How to Unclog a Shower Drain Using Chemicals

  • Read and follow the directions on the packaging, including the correct amount of the product to use. This amount you use will vary.
  • Use gloves and goggles to protect your hands and eyes.
  • Don't mix together different chemicals. This can cause poisonous gas.
  • Pour chemicals down the drain opening.

Note: Chemicals should not be used lightly. They can cause damage to your drainage pipes, especially if used repeatedly. Using chemicals is typically a fast, straightforward, and affordable method with a fairly high success rate in my experience. You can reduce the need for chemicals, however, by minimizing future blockages occurring (see the bottom of page)!
 

3. Use a Plunger

Plunging can be successful, though it depends on the nature of the blockage, the location of the clog, and the design of your drain. The plunger requires suction to work. So if the clog is deep and made of mainly hair, for instance, this method may not be effective.

How to Unclog Your Bathtub Drain Using a Plunger

  1. Add petroleum jelly to the edge of the suction pad to get a better seal.
  2. Add enough water to the bathtub so that the pad of the plunger is submerged.
  3. Plunge the bathtub drain opening vigorously.

Note: If using one plunger doesn't work, try using the two plunger method. Put one plunger over the overflow panel, so that the cup seals it off and hopefully gives you better suction, and simultaneously plunge the drain opening using the other plunger. As a method, plunging is always worth a try, as the time and costs involved are relatively small.
 

4. Remove the Drain Stopper to Inspect and Gain Access

If you've tried the above methods and none of them have worked, it's time to get down and dirty. You need to unscrew and take off the overflow plate, then remove the stopper.

The stopper works by lifting and dropping a plunger to open and close the drain. It is operated by a small lever. If the stopper is not working correctly, it can be stuck in a semi-closed position, restricting water flow. The positioning of the plunger can be easily adjusted with the lock nuts that hold the plunger to the threaded rod.
 

If the stopper works okay, then the problem is likely to be a clog, and you will need to use a plumbers' snake. You can use the overflow for access.

Note: Hair and soap can often accumulate underneath the drainage strainer too. So I would recommend removing that too for inspection and access. Some strainers can be removed manually, while others have screws that need to be removed first.
 

5. Use a Plumbers’ Snake

This is another inexpensive method for fixing a slow bathtub drain. The success rate is high if the issue your dealing with is a clog.

How to Unclog Your Bathtub Drain Using a Plumbers' Snake

  1. Feed the snake down until the clog is reached. You can gain access to the drain via the overflow, once you've removed the stopper (see above). An alternative route is via the drain opening, after you've removed the strainer.
  2. Turn the handle to bring it back up.
  3. Run water to check the drain, and make sure that the clog is completely gone.
  4. You may need to repeat the process several times.

Note: Clogs caused by invasive roots will require more than a plumbers' snake to fix.

6. Call a Plumber

If you are unwilling to take your drain apart and don't feel comfortable with using chemicals (or they simply don't work), then you will have to call out a professional plumber. It’s obviously the last resort if you are looking to save money.

That said, it is also the least trouble.
 

What Causes a Tub to Drain Slowly?

Typically the cause of a slow-draining bathtub is a clog that is restricting water flow. Clogs are usually made up of knotted hair, dirt, grease, and/or soap. They can be difficult to remove because hair can wrap around parts of the drain.

Clogs happen more frequently in homes where one or more of the bathtub users has long hair, as short hair is much less likely to get caught in the drain system.

Causes of Clogs in Bathtub Drains

Cause How It Happens

Hair

Hair can combine with soap and dirt and clump together to form clogs. It can also attach to drains and pipes, making it difficult to remove.

Soap

Traditional soap bars are made with grease or fat. The fat combines with minerals in water and leaves a hard residue that clogs pipes. Soap can also combine with hair and dirt.

Dirt

Dirt can build up and cause problems. The very nature of bathing means that we are constantly sending dirt down the drain.

Stopper

If the stopper hasn't been fitted correctly or is out of position, it may become stuck in a semi-closed position, and the plunger may restrict drainage.

Tree roots

Older underground pipes can crack or leak, attracting root growth. Once inside your pipes, roots grow larger, blocking water flow and causing pipe damage.

Mineral build up

Minerals dissolved in water can build up over time and create insoluble masses that will block your drains.

Symptoms of a Slow-Draining Tub

Slow draining means that the water stays in the tub for much longer than it should after you have pulled the plug. The water either takes longer than it should to disappear, or in more serious cases, remains indefinitely. The problem can develop gradually over a period of time and may not be noticeable immediately. It's common for many people to disregard the issue until it has become serious.

Unfortunately, once the drainage problems have begun, they will typically only get worse over time unless action is taken. This is because clogs tend to gather more debris such as hair, dirt, and soap over time, and become bigger and more firmly attached. The sooner that you deal with the problem, the easier it can be to resolve.
 

How to Prevent a Bathtub From Slow-Draining

Prevention is almost always better than cure, of course. So once your drainage problems are resolved, don't forget to minimize the possibility of your bathtub drain getting clogged again. Below are two things to try.

  • Firstly, you should certainly think about buying a good drain protector, if you don't already have one, to prevent hair, children's toys, plus other small items and debris from clogging the drain.
  • Secondly, a secure soap dish can often help, as soap contributes to clogs forming by binding knots of hair together into larger clumps. (It goes without saying that loose soap falling into the tub, or onto the floor can also cause serious accidents due to people slipping.)

Is There a Good Drain Protector That You Can Recommend for a Bathtub?

There are lots of great products out there that will do the job effectively. Bear in mind that there are different types of bathtub drain stopper and the protector you buy will have to take this into account.

Common types of bathtub drain stopper include:

  • Push-and-pull
  • Lift-and-turn
  • Toe-touch
  • Pop-up
  • Flip-it
  • Trip lever
 

Coronavirus disease (COVID-19) advice for the public: When and how to use masks

Jan 26, 2021
Coronavirus disease (COVID-19) advice for the public: When and how to use masks
View Full Size
(Source: World Health Organization)

All about masks in the context of COVID-19

Masks should be used as part of a comprehensive strategy of measures to suppress transmission and save lives; the use of a mask alone is not sufficient to provide an adequate level of protection against COVID-19.

If COVID-19 is spreading in your community, stay safe by taking some simple precautions, such as physical distancing, wearing a mask, keeping rooms well ventilated, avoiding crowds, cleaning your hands, and coughing into a bent elbow or tissue. Check local advice where you live and work. Do it all!

Make wearing a mask a normal part of being around other people. The appropriate use, storage and cleaning or disposal of masks are essential to make them as effective as possible.

Here are the basics of how to wear a mask:

  • Clean your hands before you put your mask on, as well as before and after you take it off, and after you touch it at any time.
  • Make sure it covers both your nose, mouth and chin. 
  • When you take off a mask, store it in a clean plastic bag, and every day either wash it if it’s a fabric mask, or dispose of a medical mask in a trash bin.
  • Don’t use masks with valves.


Here's How Much Bacteria Is Living on Your Toilet

Jan 25, 2021
Here's How Much Bacteria Is Living on Your Toilet
View Full Size
(Source: The Cleaner Home)

Be honest, cleaning the bathroom is low on your list of favorite chores, right? If there’s a choice between folding laundry and getting up-close-and-personal with your toilet bowl, it’s a safe bet most people (us included) would opt in for option A. But as much as we may wish we could ignore it, study after study shows that the bathroom can be a hotbed for bacteria. Which is why our team of researchers decided to find out what kind of bacteria was living in one of the most used (and most germ-filled) spots in the bathroom: the toilet.

The results, to be honest, weren’t all that surprising. Our researchers found that tens of thousands of bacteria could be living in your home’s toilet

Bacteria Living On Your Toilet 2

After swabbing the same four areas on five separate toilet bowls found in five different homes, the team found that on average, the toilets contained 125.55 colony-forming units of bacteria per square inch. That means that on a standard, 16.5-inch toilet bowl there could be more than 34,000 units of bacteria in total.

Our researchers swabbed the rim (under the lid), inner bowl, outer bowl and base of the toilet to collect their samples. After evaluating each of the five toilets, the highest number of bacteria found on a one-square-inch swab was found on the inner bowl, with over 1,500 units of bacteria calling it home (making that Microban-protected toilet brush even more critical to your cleaning arsenal!).

There may be many factors that make the toilet public enemy number one for a bacteria-filled bathroom, but another study found that the porcelain surface of toilet bowls is likely retaining bacteria/viruses and only releasing them during flushes. One easy fix? Shut the lid when you flush. The same study found that when the lid was left open, microbes were released into the air and were able to travel up to six feet, landing on surrounding surfaces.

Using products infused with built-in technology like Microban is the best solution to inhibiting the growth of bacteria in your bathroom, as it works around-the-clock to keep harmful microbes from growing where you don’t want them to.


Here's How to Figure Out Why Your Toilet Keeps Clogging

Jan 22, 2021
Here's How to Figure Out Why Your Toilet Keeps Clogging
View Full Size
(Source: Williams Comfort Air)

Here's How to Figure Out Why Your Toilet Keeps Clogging

Trying to fix a clogged toilet by hand - Williams Comfort Air Heating, Cooling, Plumbing & More

When a toilet keeps clogging, there are several potential causes of this issue. What you flush down, problems with your drain lines, and issues with the toilet itself are all possibilities. The Indianapolis plumbers of Williams Comfort Air detail the reasons a toilet keeps clogging and shares solutions to help you avoid this problem at home.

What’s to Blame When Your Toilet Keeps Clogging?

Frequent toilet clogs are a sign something is not right – the issue typically has to do with your plumbing, your toilet, or what goes down it. Common causes when a toilet keeps clogging include:

  • You have an older model low flow toilet
  • Items that shouldn’t be flushed have been flushed
  • Too much toilet paper use
  • The toilet trap is clogged
  • The toilet vent is blocked
  • Your sewer line is clogged

Our Indianapolis plumbers review the common reasons a toilet keeps clogging, what you are able to do to remedy clogs, and when you need professional services.

Older Low Flow Toilets

If your home is equipped with early model low flow toilets, the fixture itself could be the reason your toilet keeps clogging. Some older low flow toilets simply do not have the pressure needed to consistently push material through the trap and drain. Poor flushing pressure leaves material behind which results in constant clogs.

What to do:

Replacing your older low flow toilet is a sure-fire way to eliminate constant clogs caused by lack of flushing pressure. However, if replacement is not an option, reduce the amount of toilet paper you use and materials flushed to help prevent toilet clogs.

Low flow toilets manufactured in the mid-1990s are typically first-generation models, which are prone to this clogging issue. If your toilet is an older low flow model, check out new low flow fixtures and make upgrades throughout your home to increase flush pressure and reduce toilet clogs. Your plumber is able to help you select new toilets that conserve water and install them in your bathrooms.

Flushing Non-Flushable Items

The only items meant to go down your toilets are human waste and toilet paper. When households begin to send other types of paper or hygiene products down with a flush, a toilet keeps clogging because it is not meant to dispose of these items. 

This type of constant clog issue affects all sorts of households. Many people have been misinformed about what can and cannot go down the toilet – so-called “flushable” wipes are some of the biggest offenders plumbers see today! Some people have gotten into the habit of flushing all bathroom waste down the toilet for disposal, including Q-tips and cotton balls, so the toilet keeps clogging. Non-flushable items are a common clog hazard in households with young children who are curious about the toilet.

What to do:

If a clog forms due to improper items in the drain, use a flanged plunger to dislodge the clog. If this does not work, use a toilet auger to break up material and clear the drain.

Take the time to remind your family members what goes down the toilet drain and what needs to be kept out. If you have young children, teach them the toilet is not a play place and their toys and other things are never to be put into the toilet and flushed. 

Excessive TP Use

Yes, toilet paper is made to go down the drain without causing clogs – when you use proper amounts. When too much toilet paper is used, it doesn’t dissolve properly, so it sticks in the toilet or drain lines and the toilet keeps clogging.

Also, some types of 2-ply toilet paper don’t always dissolve well, which leads to clogs. While it feels more comfortable to use, it creates more problems for your household.

What to do:

Most consumers use 8 to 9 squares of toilet paper per wipe, when in fact, 3 to 4 squares will do the trick just fine! Encourage household members to reduce their toilet paper usage to prevent toilet clogs. As you potty train young family members, it is helpful to mark the proper length of toilet paper on the wall or cabinet down from the dispenser to help them use the right amount each time.

Instead of using ultra plus toilet paper, try folding your toilet paper sheets to create the thickness you desire. Always fold toilet paper for use rather than balling it up, as this practice contributes to clogs. With more conscientious use of your toilet tissue, many toilet clogs are prevented.

Clogged Toilet Trap

Most homeowners know about a sink’s P-trap, but do you know that your toilet has a trap, too? Instead of a P shape, the toilet’s trap is an S shape and sits between the toilet bowl and the drain line. Just like a sink’s P-trap, the purpose of the toilet’s trap is to catch objects and prevent them from moving to the drain line to cause a clog.

Due to its purpose, this is a common area of the fixture where items get stuck. Excess waste and toilet paper or non-flushable items can become lodged in the toilet trap after they are flushed. When there is a significant mass stuck in the toilet trap, the toilet keeps clogging as normally flushed material is more likely to catch and clog.

What to do:

If you believe a blockage sits in your toilet’s trap, try plunging the toilet to move the clog along. Use a flanged toilet plunger to force water through the trap and move the clog. 

If plunging does not work, a toilet auger is another option to clear the clog. Insert the auger into the toilet drain and move it forward until you hit resistance – if resistance occurs just beyond the toilet bowl’s drain, a clog in the toilet trap is likely. Rotate the auger to break up clog material and grasp on to pull the remaining material out of the drain. If you are unable to clear the clog, it’s time to call a plumber for drain cleaning services.

Blocked Toilet Vent

You probably do not realize it, but your home’s toilets are connected to a vent that exits your home, typically through the roof. The toilet vent allows fresh air to enter your home’s plumbing system, which increases the pressure of flushes. 

If a toilet vent becomes blocked, the toilet loses flushing pressure. With poor pressure the toilet keeps clogging more frequently, and clogs become a consistent problem. A blocked toilet vent creates other household issues, such as gurgling noises from the toilet, slow drainage throughout the home, and sewer odors indoors.

What to do:

Toilet vents commonly become blocked at their opening on the roof, or where they connect to your sewer line inside the home. If you suspect a blocked toilet vent is the cause when a toilet keeps clogging, your first step is to check the roof.

  1. Use a ladder and a spotter to safely climb onto your home’s roof and locate where the toilet vent penetrates through the roof (it’s usually above where your main bathroom sits).
  2. Remove the vent cap to check for debris that have entered the vent. Reach into the vent to remove any debris you are able to touch.
  3. Use the spray nozzle on your garden hose to send water down through the toilet vent. Some blockages are cleared this way, but if the water backs up out of the vent opening, the blockage has not moved through the line.
  4. Insert a toilet auger into the toilet vent – your auger should be at least 20 feet long or it may not reach to the vent/sewer line connection. Rotate the auger to bust through the obstruction and then remove the auger.
  5. Flush some water down the toilet vent to verify the blockage is cleared. If water continues to back up, you need the help of a plumber.

Clogged Sewer Line

Some clogs are able to fully exit your plumbing fixtures and individual drain lines, but become trapped in the home’s main sewer line. Clogs in the sewer line cause problems with drainage across the entire home, and are difficult to correct on your own.

Sometimes, sewer lines become clogged due to outside sources, such as tree root penetrations, sewer line breaks, and sewer line infiltrations. These issues make it so your toilet keeps clogging, as they impact drainage and your plumbing system’s ability to move waste out of your home. Sewer line repairs are needed if this problem is present.

What to do:

Unfortunately, sewer line clogs must be corrected by a plumber. Ignoring sewer line clogs means your toilet keeps clogging and eventually, more damage is done to your home’s plumbing system. If you suspect a sewer line clog, you need to call a plumber to schedule drain cleaning services.

Protect yourself and others from COVID-19

Jan 21, 2021
Protect yourself and others from COVID-19
View Full Size
( Source : World Health Organization )

If COVID-19 is spreading in your community, stay safe by taking some simple precautions, such as physical distancing, wearing a mask, keeping rooms well ventilated, avoiding crowds, cleaning your hands, and coughing into a bent elbow or tissue. Check local advice where you live and work. Do it all!


What to do to keep yourself and others safe from COVID-19

  • Maintain at least a 1-metre distance between yourself and others to reduce your risk of infection when they cough, sneeze or speak. Maintain an even greater distance between yourself and others when indoors. The further away, the better.
  • Make wearing a mask a normal part of being around other people. The appropriate use, storage and cleaning or disposal are essential to make masks as effective as possible.

Here are the basics of how to wear a mask:

  • Clean your hands before you put your mask on, as well as before and after you take it off, and after you touch it at any time.
  • Make sure it covers both your nose, mouth and chin.
  • When you take off a mask, store it in a clean plastic bag, and every day either wash it if it’s a fabric mask, or dispose of a medical mask in a trash bin.
  • Don’t use masks with valves.
 
 
  • For specifics on what type of mask to wear and when, read our Q&A and watch our  videos. There is also a Q&A focused on masks and children.
  • Find out more about the science of how COVID-19 infects people and our bodies react by watching or reading this interview.
  • For specific advice for decision makers, see WHO’s technical guidance.


How to make your environment safer


  • Avoid the 3Cs: spaces that are closed, crowded or involve close contact.
    • Outbreaks have been reported in restaurants, choir practices, fitness classes, nightclubs, offices and places of worship where people have gathered, often in crowded indoor settings where they talk loudly, shout, breathe heavily or sing.
    • The risks of getting COVID-19 are higher in crowded and inadequately ventilated spaces where infected people spend long periods of time together in close proximity. These environments are where the virus appears to spread by respiratory droplets or aerosols more efficiently, so taking precautions is even more important.
  • Meet people outside. Outdoor gatherings are safer than indoor ones, particularly if indoor spaces are small and without outdoor air coming in.
    • For more information on how to hold events like family gatherings, children’s football games and family occasions, read our Q&A on small public gatherings.
  • Avoid crowded or indoor settings but if you can’t, then take precautions:

Don’t forget the basics of good hygiene

  • Regularly and thoroughly clean your hands with an alcohol-based hand rub or wash them with soap and water. This eliminates germs including viruses that may be on your hands.
  • Avoid touching your eyes, nose and mouth. Hands touch many surfaces and can pick up viruses. Once contaminated, hands can transfer the virus to your eyes, nose or mouth. From there, the virus can enter your body and infect you.
  • Cover your mouth and nose with your bent elbow or tissue when you cough or sneeze. Then dispose of the used tissue immediately into a closed bin and wash your hands. By following good ‘respiratory hygiene’, you protect the people around you from viruses, which cause colds, flu and COVID-19.
  • Clean and disinfect surfaces frequently especially those which are regularly touched, such as door handles, faucets and phone screens.


What to do if you feel unwell

  • Know the full range of symptoms of COVID-19. The most common symptoms of COVID-19 are fever, dry cough, and tiredness. Other symptoms that are less common and may affect some patients include loss of taste or smell, aches and pains, headache, sore throat, nasal congestion, red eyes, diarrhoea, or a skin rash.
  • Stay home and self-isolate even if you have minor symptoms such as cough, headache, mild fever, until you recover. Call your health care provider or hotline for advice. Have someone bring you supplies. If you need to leave your house or have someone near you, wear a medical mask to avoid infecting others.
  • If you have a fever, cough and difficulty breathing, seek medical attention immediately. Call by telephone first, if you can and follow the directions of your local health authority.
  • Keep up to date on the latest information from trusted sources, such as WHO or your local and national health authorities. Local and national authorities and public health units are best placed to advise on what people in your area should be doing to protect themselves.


HOW CAN I PREVENT COVID-19?

Jan 19, 2021
HOW CAN I PREVENT COVID-19?
View Full Size
(Source: Avert.org)

The best way to prevent coronavirus (COVID-19) is through good respiratory hygiene. This includes regular hand washing and covering your mouth and nose when you sneeze or cough. Follow your local government's advice for further precautions where necessary.

How can I prevent COVID-19?

How Do You Fix a Broken Toilet?

Jan 18, 2021
How Do You Fix a Broken Toilet?
View Full Size
(Source: Anthony Wimpey Plumbing)

Have you found yourself asking, “How do you fix a broken toilet?” Here are some reasons for your toilet woes.

If a running toilet keeps you up at night, you may wonder, “How do you fix a broken toilet?” As one of the most used household appliances, the odds are good that you’ll need to repair your toilet at least once in your lifetime. But when everything backs up, what will you do?

Toilets are not a modern luxury—they have been around for hundreds of years. Since their introduction, toilets have undergone many changes, but one thing remains certain—you don’t fully appreciate a commode until it stops working. Luckily, most problems are easy to fix, and a quick service call from a local plumber will have your throne ready for its next visitor.

The Marathon Runner

Under normal circumstances, a toilet only runs long enough to refill the bowl and tank with water. If your toilet doesn’t stop filling in less than a minute, you may have a marathon runner on your hands. Sure, jiggling the handle may solve the problem for the short-term, but what can you do to stop a running toilet?

A toilet runs whenever there is a leak in the tank. If water keeps escaping from the tank, it will continue to fill. In most cases, a broken flapper is to blame. If you open the lid of the tank, you’ll find a rubber stopper that covers a drainage hole. This piece is the flapper. Look it over. Do you notice any corrosion or warping? If so, then a replacement part is all you need.

The Ghost Flusher

Have you ever heard your toilet flush even though no one was in the bathroom? While you may suspect a ghost, the chances are good that you’re not experiencing paranormal activity. Instead, you have a toilet in need of repair. A few things may cause phantom flushing, including:

  • A deteriorating flapper
  • A leak in the tank
  • Too much water in the tank
  • A bad flush valve gasket

Since multiple sources can be the problem, it’s best to hire a plumber to investigate. Otherwise, you may replace several parts before you find the real culprit. A plumber knows best and will save you money by streamlining the repair process.

The Crying Toilet

Check the floor around your toilet. Is it dry, or do you notice dampness? Any wetness around the base of your commode is a surefire sign of a leak. Before you can remedy the situation, however, you need to determine the source of the leaking water.

Leaks on the wall near the water supply valve are common. If you can trace the wetness to this location, then you probably need to repair this valve. Simply tightening the valve connection may solve all of your problems. But if you notice corrosion around the supply line, you need a plumber to replace it for you. While you may want to DIY the repair, it can get quite complicated, and you may end up doing more harm than good.

The supply line may also leak where it enters the tank. If you notice water dripping from the back of the tank, try tightening the supply line connection. This repair is similar to a leak near the wall. You should also inspect the fill valve assembly to make sure it’s securely in place.

Water may also leak where the bowl and tank connect. If you own a two-piece toilet, make sure any bolts are tight and in the right place. You should also replace the gasket if it shows signs of damage. In the worst-case scenario, you may find a crack in the tank itself. While you may be able to repair the crack with a sealant, replacing the toilet is usually a better option.

Fix a Broken Toilet

The Choking Toilet

When you flush, the water level in the bowl should rise and then fall, pushing down everything with it. If your toilet struggles to flush or makes a choking sound, however, a clog in the pipe is most likely the cause.

Toilet clogs are very common. Every household should invest in a plunger—which only costs a few dollars at the local hardware store. If the clog is relatively close to the surface, plunging the toilet should be enough to push it through. However, more stubborn, deeper clogs may require the specialized tools of a plumber.

Most toilets clog on occasion, but there are few things you can do to minimize the risk. Never flush anything besides toilet paper. Baby wipes, paper towels, and feminine hygiene products are notorious for clogging the pipes. Even if a product claims to be “flushable,” it’s best to toss it in the nearest trashcan now instead of having to fix a broken toilet later.

The Erupting Toilet

Has your toilet become Mount Vesuvius? There’s nothing more heart-stopping than watching dirty water rise to the top after flushing. Will it stop, or will it overflow onto the floor? While a toilet that overflows once isn’t a big concern, you may want to call a plumber if the problem persists.

A deep clog in the line is the number one reason for an overflowing—or erupting—toilet. Wastewater has to go somewhere, and if it can’t fit down the pipes, it will most likely end up on your bathroom floor. Once again, plunging the bowl may help. However, if the issue recurs, you may have a more serious problem on your hands.

A clogged sewer line may cause problems in your entire plumbing system. Do you also notice gurgling sounds in the shower drain? If so, you need to call a professional plumber right away. The problem will only get worse if you ignore it. Plumbers have tools and cameras that allow them to see inside the pipes under your house. If a plumber locates a blockage, they can remove it, no matter how deeply embedded it has become. They may even recommend repairing or replacing a few of your sewer pipes.

The Ultimate Solutions to 6 Common Bathroom Cleaning Problems

Jan 15, 2021
The Ultimate Solutions to 6 Common Bathroom Cleaning Problems
View Full Size
( Source : Shower Lagoon )

Bathroom hygiene is important, and you should make it a habit to keep the area thoroughly clean. No matter how luxurious your bathroom is, your shower time will never feel relaxing enough if basic cleanliness is not maintained. Proper cleaning products for specific purposes and a regular cleaning schedule are the keys to making sure your bathroom stays sparkling clean. Whether it is hard water residue on glass shower doors or mould and mildew on curtains, here is the solution to all of it.

Top Bathroom Cleaning Problems

Here are a few bathroom cleaning problems commonly faced by homeowners. They can develop for any number of reasons, ranging not cleaning regularly to not using the right cleaning products.

  1. “Shower curtains are infested with mildew”

Shower curtains are tricky to clean as they are often big and heavy. Getting rid of mildew in particular can be challenging. The best solution is to wash it with a bleach solution. Add half a cup of bleach to a gallon of warm water, and, while wearing plastic gloves, wipe the curtains with a sponge and rinse them with your showerhead. If privacy is the reason you use curtains, consider replacing them with frosted shower glass which is much easier to clean.

  1. “Brass fixtures have become dull”

Over time, brass bathroom fixtures tend to lose their lustre thanks to hard water. You can make them shine again, though, by polishing them with a 1:1 paste of baking soda and lemon juice. Dip an old toothbrush in the paste and scrub the fixtures lightly. Let it dry for a few minutes and then buff it with a clean cloth to reveal brand new-looking fixtures. The same can be done for metal supports and holders for glass enclosures and doors.

  1. “Discolouration and accumulating dirt in hard-to-reach corners”

Cleaning your bathroom means reaching every hard-to-reach nook and corner to eradicate all dirt and germs. The easiest way to clean such corners is to use an old toothbrush and a strong, high-quality cleaning solution. Loosen the dirt using a toothbrush and mop it with a damp sponge. Sliding glass doors tracts and the areas behind sinks require extra attention while cleaning.

  1. “Scum build-up on glass shower doors”

Frothy soap scum on shower doors looks unsightly and makes the glass look clouded. It is also difficult to remove once it builds up. You can prevent that build-up by coating the glass doors and enclosure with a thin layer of lemon oil furniture oil. Let the oil sit for a couple of minutes and then polish it with a clean microfibre cloth. Using a squeegee after every shower is also an effective way to discourage build-up.

  1. “The glass shower doors are cloudy”

Over time, glass shower doors become cloudy from water vapour, soap splatter and scratches. Mineral build-up as well can alter the texture of the glass. This can be cleaned with vinegar, baking soda and salt. Spray the vinegar on the glass and let it sit for a few minutes. Make a paste using equal parts salt and soda. Using a damp sponge, rub this paste on the glass and then rinse well to reveal sparkling clean glass that is as good as new.

  1. “The bathroom grout is discoloured with mildew”

Grout discoloured by damp and mildew will eventually look unsightly. Vinegar is a versatile kitchen ingredient that can help clean grout and get rid of mildew. Spray the mildew-infested area with vinegar and use an old toothbrush to scrub the grout. For tile grout, remove mildew by spraying a solution of household bleach and water on it. Wipe off after ten minutes with a clean and dry cotton cloth.

Factors to Keep in Mind

Here are some important factors to note when cleaning the bathroom:

  • Use good bathroom cleaning products specifically designed for your needs. That means using separate cleaners for tile, hardwood and vinyl. Similarly, invest in cleaners specifically designed for glass enclosures to make your bathroom cleaning routine runs smoother.
  • Clean your bathroom regularly.
  • Use gloves when handling bleach.
  • Seek professional advice if glass enclosures or other parts of your bathroom prove too difficult to clean by using home remedies and domestic tools/cleaners.

A Guide to Good Personal Hygiene

Jan 12, 2021
A Guide to Good Personal Hygiene
View Full Size
(Source: EverydayHealth)
By Beth W.Orenstein

Personal hygiene habits such as washing your hands and brushing and flossing your teeth will help keep bacteria, viruses, and illnesses at bay. And there are mental as well as physical benefits. “Practicing good body hygiene helps you feel good about yourself, which is important for your mental health,” notes Donald Novey, MD, an integrative medicine physician with the Advocate Medical Group in Park Ridge, Ill. People who have poor hygiene — disheveled hair and clothes, body odor, bad breath, missing teeth, and the like — often are seen as unhealthy and may face discrimination.

Personal Hygiene: Healthy Habits Include Good Grooming

If you want to minimize your risk of infection and also enhance your overall health, follow these basic personal hygiene habits:

  • Bathe regularly. Wash your body and your hair often. “I’m not saying that you need to shower or bathe every day,” remarks Dr. Novey. “But you should clean your body and shampoo your hair at regular intervals that work for you.” Your body is constantly shedding skin. Novey explains, “That skin needs to come off. Otherwise, it will cake up and can cause illnesses.”
  • Trim your nails. Keeping your finger and toenails trimmed and in good shape will prevent problems such as hang nails and infected nail beds. Feet that are clean and dry are less likely to contract athlete’s foot, Novey says.
  • Brush and floss. Ideally, you should brush your teeth after every meal. At the very least, brush your teeth twice a day and floss daily. Brushing minimizes the accumulation of bacteria in your mouth, which can cause tooth decay and gum disease, Novey says. Flossing, too, helps maintain strong, healthy gums. “The bacteria that builds up and causes gum disease can go straight to the heart and cause very serious valve problems,” Novey explains. Unhealthy gums also can cause your teeth to loosen, which makes it difficult to chew and to eat properly, he adds. To maintain a healthy smile, visit the dentist at six-month intervals for checkups and cleanings.
  • Wash your hands. Washing your hands before preparing or eating food, after going to the bathroom, after coughing or sneezing, and after handling garbage, goes a long way toward preventing the spread of bacteria and viruses. Keep a hygiene product, like an alcohol-based sanitizing gel, handy for when soap and water isn’t available.
  • Sleep tight. Get plenty of rest — 8 to 10 hours a night — so that you are refreshed and are ready to take on the day every morning. Lack of sleep can leave you feeling run down and can compromise your body's natural defenses, your immune system, Novey says.

Personal Hygiene: Poor Hygiene Hints at Other Issues

If someone you know hasn’t bathed or appears unkempt, it could be a sign that he or she is depressed. “When people are sad or depressed, they neglect themselves,” Novey says. Talking about the importance of proper personal hygiene for preventing illnesses and providing personal hygiene items may help some people. Be candid but sensitive and understanding in your discussions, Novey says. Despite your best efforts, your friend or loved one may need professional help. You should encourage them to see a counselor or doctor if their personal hygiene doesn’t improve.

Personal Hygiene: Good Habits Help Keep You Healthy

For most people, good hygiene is so much a part of their daily routines that they think little about it. They bathe, they brush their teeth, visit the dentist and doctor for regular checkups, and wash their hands when preparing or eating food and handling unsanitary items. To keep those you care about healthy and safe, help them learn, and be sure that they are practicing, good personal hygiene.


HOW TO FIX A WEAK OR INCOMPLETE TOILET FLUSH

Jan 8, 2021
HOW TO FIX A WEAK OR INCOMPLETE TOILET FLUSH
View Full Size
( Source: Fluidmaster)

Toilets that have been in use for some time can develop a lazy or weak flush. It is quite common for minerals such as calcium and lime, along with debris particles such as rust to build up in the rim feed and jet holes of the toilet bowl. Over time, these deposits restrict and block water from flowing into the toilet bowl which will cause a weak or incomplete flush.

1. Cleaning the rim (feed holes) and jet holes of your toilet

    1. Turn the water supply valve off.
    2. Holding the flapper open (see Picture below), let the majority of the water fall out of the tank.

weak_flush1

    1. Using a toilet bowl cleaner, for example Lime-A-Way® or Clorox®, hold the flapper open and pour 1–2 cups of cleaning solution down the flush valve opening. Be careful to not let any cleaner spill over into the tank. If it does, wipe it up immediately. Let the toilet sit unused for several hours or overnight. The cleaning solution will work its way into the flow channels and help to dissolve any mineral build up.
    2. Using a wire hanger, feed the hanger into the rim feed holes located under the lip of the toilet (see Picture below). Work the hanger in and out of the holes several times to scrape away and break free any hard build up.

weak_flush2

  1. Turn the water supply back on and let the tank refill. Flush the toilet several times to flush out any leftover cleaning solution or deposits.
  2. To clear the jet, using the wire hanger, make a small hook at the end of the hanger. Push the hanger up into the jet hole and fish out any paper or waste that may be trapped in the jet passage way. (See picture above.)

2. Other Causes for an Incomplete or Weak Flush

  1. Check the Water Level in the tank. If your water level is more than 1 inch below the top of the overflow pipe, it may be that the low water level is not enough for a good flush. Raise the water level to within 1 inch of the top of the overflow pipe using the water level adjustment screw on the fill valve or by adjusting the height of the fill valve.
  2. Flapper closes too soon (and water level is at the appropriate height). If the flapper closes too quickly during the flush, not enough water is released to complete the flush.

NOTE: Make sure there is minimal slack on the flapper chain. For most toilets, there should only be ½ inch of slack of chain length needed to operate the flapper

If you have a toilet that uses 5.0 gallons per flush (gpf) or more, make sure that you are using a non-adjustable flapper.

If you have a toilet that uses 3.5 gpf, 1.6 gpf or less, check the flapper for adjustable settings.


3 Reasons Your Toilet Keeps Running

Jan 7, 2021
3 Reasons Your Toilet Keeps Running
View Full Size
(Source:All City Plumbing)

Why Does My Toilet Keep Running?

When a toilet starts running and doesn’t stop after the normal flush cycle, people often stare blankly at the tank wondering what the problem is, or jiggle the flush valve to see if that fixes anything. While those solutions won’t do you any good, there are a few simple things you can do to fix a running toilet. The first step is to determine the cause, and then you can act accordingly to stop the toilet from running.

Toilets that keep running may have one of the following problems:

  • The float height needs to be adjusted 
  • The flapper is leaking and needs to be replaced
  • The refill tube needs to be shortened

Tools and materials you may need:

  • Rubber gloves
  • Replacement fill valve
  • Toilet replacement parts
  • Multi-bit screwdriver
  • Cutting pliers

We strongly advise that you contact an expert plumber to inspect the situation for you, as there could be other issues with your toilet that may need repair and maintenance. However, that doesn't mean that you can't inspect your toilet yourself! Here are some things that you can do to help fix your running toilet in the meantime.

1. You Need to Lower the Float

Among the most common causes for a running toilet is overflow water leaking down into the bowl from the tank via the overflow tube. This happens when there's too much water in the tank. You can adjust the water level by adjusting the height of the float.

To lower the water in a toilet with a float arm, loosen or tighten the screw until the float arm lowers.

To lower the water in a toilet with a column float attached to the fill valve, loosen the screw or clip, push down the float, and tighten everything back up again.

2. The Flapper Is Leaking and Needs Replacing

Plumber fixing a toilet that keeps running
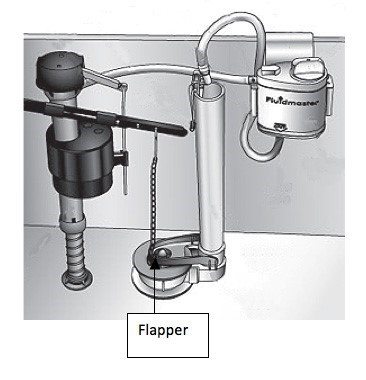
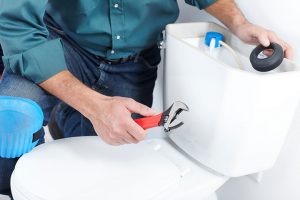
Perhaps the most common reason for a running toilet is an old flapper that needs to be replaced. When flappers get old, they don’t seal the way they should, and this allows water to pass constantly from the toilet tank into the bowl.

To replace the flapper, simply remove the old one and replace it with a new one from the hardware store. Remove the old one by detaching the chain and taking the flapper off the pins on the side of the overflow tube. To attach the new one, connect the chain and attach the sides to the pins.

Tip: Drain the water from the tank before you replace the flapper. Shut off the water supply to the toilet, and then flush the toilet to drain the water.

Tip: If the chain is too long on the new flapper, you may need to shorten it. If it’s long enough to get caught underneath the flapper, you won’t get a good seal, and the toilet will continue to run.

3. You Have to Shorten the Refill Tube Plumbing refill tube adjustment for running toilets

Another cause behind your running toilet could be that the refill tube is always pumping water into the bowl, and this happens when the tube is too long and isn't positioned properly in the overflow tube.

To shorten a refill tube, pull the tube out of the overflow and hold it just above the opening of the overflow, trim it off there, and clip it to the side of the overflow tube to keep it in place.

Note: The reason this causes the toilet to run is that the refill valve will create a suction effect that pulls water out of the fill valve.

Coronavirus (COVID-19) Prevention: 12 Tips and Strategies

Jan 5, 2021
Coronavirus (COVID-19) Prevention: 12 Tips and Strategies
View Full Size
(Source: healthline)

The new coronavirus is officially called SARS-CoV-2, which stands for severe acute respiratory syndrome coronavirus 2. An infection with this virus can lead to coronavirus disease 19, or COVID-19.

SARS-CoV-2 is related to the coronavirus SARS-CoV, which caused another kind of coronavirus disease in 2002 to 2003.

However, from what we know so far, SARS-CoV-2 is different from other viruses, including other coronaviruses.

The evidence shows that SARS-CoV-2 may be transmitted more easily and cause life-threatening illness in some people.

Like other coronaviruses, it can survive in the air and on surfaces long enough for someone to contract it.

It’s possible that you could acquire SARS-CoV-2 if you touch your mouth, nose, or eyes after touching a surface or object that has the virus on it. However, this is not thought to be the main way that the virus spreads

However, SARS-CoV-2 multiplies faster in the body even when you don’t have symptoms. Additionally, you can transmit the virus even if you never get symptoms at all.

Some people have mild to moderate symptoms only, while others have severe COVID-19 symptoms.

Here are the medical facts to help us understand how to best protect ourselves and others.


Follow the guidelines to help protect yourself from contracting and transmitting SARS-CoV-2.

1. Wash your hands frequently and carefully

Use warm water and soap and rub your hands for at least 20 seconds. Work the lather to your wrists, between your fingers, and under your fingernails. You can also use an antibacterial and antiviral soap.

Use hand sanitizer when you cannot wash your hands properly. Rewash your hands several times a day, especially after touching anything, including your phone or laptop.

2. Avoid touching your face

SARS-CoV-2 can live on some surfaces for up to 72 hours. You can get the virus on your hands if you touch a surface like:

  • gas pump handle
  • your cell phone
  • a doorknob

Avoid touching any part of your face or head, including your mouth, nose, and eyes. Also avoid biting your fingernails. This can give SARS-CoV-2 a chance to go from your hands into your body.

3. Stop shaking hands and hugging people — for now

Similarly, avoid touching other people. Skin-to-skin contact can transmit SARS-CoV-2 from one person to another.

4. Don’t share personal items

Do not share personal items like:

  • phones
  • makeup
  • combs

It’s also important not to share eating utensils and straws. Teach children to recognize their reusable cup, straw, and other dishes for their own use only.

5. Cover your mouth and nose when you cough and sneeze

SARS-CoV-2 is found in high amounts in the nose and mouth. This means it can be carried by air droplets to other people when you cough, sneeze, or talk. It can also land on hard surfaces and stay there for up to 3 days.

Use a tissue or sneeze into your elbow to keep your hands as clean as possible. Wash your hands carefully after you sneeze or cough, regardless.

6. Clean and disinfect surfaces

Use alcohol-based disinfectants to clean hard surfaces in your home like:

  • countertops
  • door handles
  • furniture
  • toys

Also, clean your phone, laptop, and anything else you use regularly several times a day.

Disinfect areas after you bring groceries or packages into your home.

Use white vinegar or hydrogen peroxide solutions for general cleaning in between disinfecting surfaces.

7. Take physical (social) distancing seriously

If you’re carrying the SARS-CoV-2 virus, it’ll be found in high amounts in your spit (sputum). This can happen even if you don’t have symptoms.

Physical (social) distancing, also means staying home and working remotely when possible.

If you must go out for necessities, keep a distance of 6 feet (2 m) from other people. You can transmit the virus by speaking to someone in close contact to you.

8. Do not gather in groups

Being in a group or gathering makes it more likely that you’ll be in close contact with someone.

This includes avoiding all religious places of worship, as you may have to sit or stand too close to another congregant. It also includes not congregating at parks or beaches.

9. Avoid eating or drinking in public places

Now is not the time to go out to eat. This means avoiding restaurants, coffee shops, bars, and other eateries.

The virus can be transmitted through food, utensils, dishes, and cups. It may also be temporarily airborne from other people in the venue.

You can still get delivery or takeaway food. Choose foods that are thoroughly cooked and can be reheated.

High heat (at least 132°F/56°C, according to one recent, not-yet-peer-reviewed lab study) helps to kill coronaviruses.

This means it may be best to avoid cold foods from restaurants and all food from buffets and open salad bars.

10. Wash fresh groceries

Wash all produce under running water before eating or preparing.

The CDCTrusted Source and the FDATrusted Source do not recommend using soap, detergent, or commercial produce wash on things like fruits and vegetables. Be sure to wash hands before and after handling these items.

11. Wear a (homemade) mask

The Centers for Disease Control and Prevention (CDC) recommendsTrusted Source that almost everyone wears a cloth face mask in public settings where physical distancing may be difficult, such as grocery stores.

When used correctly, these masks can help prevent people who are asymptomatic or undiagnosed from transmitting SARS-CoV-2 when they breathe, talk, sneeze, or cough. This, in turn, slows the transmission of the virus.

The CDC’s website provides instructionsTrusted Source for making your own mask at home, using basic materials such as a T-shirt and scissors.

Some pointers to keep in mind:

  • Wearing a mask alone will not prevent you from getting a SARS-CoV-2 infection. Careful handwashing and physical distancing must also be followed.
  • Cloth masks aren’t as effective as other types of masks, such as surgical masks or N95 respirators. However, these other masks should be reserved for healthcare workers and first responders.
  • Wash your hands before you put on your mask.
  • Wash your mask after each use.
  • You can transfer the virus from your hands to the mask. If you’re wearing a mask, avoid touching the front of it.
  • You can also transfer the virus from the mask to your hands. Wash your hands if you touch the front of the mask.
  • A mask shouldn’t be worn by a child under 2 years old, a person who has trouble breathing, or a person who can’t remove the mask on their own.

12. Self-quarantine if sick

Call your doctor if you have any symptoms. Stay home until you recover. Avoid sitting, sleeping, or eating with your loved ones even if you live in the same home.

Wear a mask and wash your hands as much as possible. If you need urgent medical care, wear a mask and let them know you may have COVID-19.


Following the guidelines diligently is important because SARS-CoV-2 is different than other coronaviruses, including the one it’s most similar to, SARS-CoV.

Ongoing medical studies show exactly why we must protect ourselves and others from getting a SARS-CoV-2 infection.

Here’s how SARS-CoV-2 may cause more problems than other viruses:

You may not have symptoms

You can carry or have a SARS-CoV-2 infection without any symptoms at all. This means you may unknowingly transmit it to more vulnerable people who may become very ill.

You can still spread the virus

You can transmit, or pass on, the SARS-CoV-2 virus before you have any symptoms.

In comparison, SARS-CoV was mainly only infectious days after symptoms began. This means that people who had the infection knew they were ill and were able to stop the transmission.

It has a longer incubation time

SARS-CoV-2 may have a longer incubation time. This means that the time between getting the infection and developing any symptoms is longer than other coronaviruses.

According to the CDCTrusted Source, SARS-CoV-2 has an incubation period of 2 to 14 days. This means that someone who’s carrying the virus may come into contact with many people before symptoms begin.

You may get sicker, faster

SARS-CoV-2 may make you more unwell much earlier. Viral loads — how many viruses you’re carrying — were highest 10 days after symptoms began for SARS CoV-1.

In comparison, doctors in China who tested 82 people with COVID-19 found that the viral load peaked 5 to 6 days after symptoms began.

This means that the SARS-CoV-2 virus may multiply and spread in someone who has COVID-19 disease almost twice as fast as other coronavirus infections.

It can stay alive in the air

Lab tests show that both SARS-CoV-2 and SARS-CoV can stay alive in the air for up to 3 hours.

Other hard surfaces like countertops, plastics, and stainless steel can harbor both viruses. The virus may stay on plastic for 72 hours and 48 hours on stainless steel.

SARS-CoV-2 can live for 24 hours on cardboard and 4 hours on copper — a longer time than other coronaviruses.

You may be very contagious

Even if you do not have symptoms, you can have the same viral load (number of viruses) in your body as a person who has severe symptoms.

This means you may be just as likely to be contagious as someone who has COVID-19. In comparison, other previous coronaviruses caused lower viral loads and only after symptoms were present.

Your nose and mouth are more susceptible

2020 report noted that the new coronavirus likes to move into your nose more than in the throat and other parts of the body.

This means that you may be more likely to sneeze, cough, or breathe SARS-CoV-2 out into the air around you.

It may travel through the body faster

The new coronavirus may travel through the body faster than other viruses. Data from China found that people with COVID-19 have the virus in their nose and throat only 1 day after symptoms begin.


Call your doctor if you think you or a family member may have a SARS-CoV-2 infection or if you have any symptoms of COVID-19.

Do not go to a medical clinic or hospital unless it’s an emergency. This helps to avoid transmitting the virus.

Be extra watchful for worsening symptoms if you or your loved one has an underlying condition that may give you a higher chance of getting severe COVID-19, such as:

  • asthma or other lung disease
  • diabetes
  • heart disease
  • low immune system

The CDCTrusted Source advises getting emergency medical attention if you have COVID-19 warning signs. These include:

  • difficulty breathing
  • pain or pressure in the chest
  • blue-tinged lips or face
  • confusion
  • drowsiness and inability to wake
 

Switch to Mobile Version